Resources
See how persona mapper works.![]()

Featured Resources
All Resources
Getting Started
User Experience Research (UXR) is undeniably one of the most critical steps in creating successful digital products and experiences. However, traditional UXR methods often fall short, being time-consuming, costly, and failing to deliver the compelling, actionable insights that researchers desire.
BuildUX is a collaborative UXR platform that transforms the UX Research phase of product development. By automating and streamlining the process, BuildUX reduces design cycles and elevates the overall quality of digital products right in their development stage.
Persona Mapper, the platform's inaugural UXR tool, empowers UX Researchers with unparalleled speed and collaboration. By leveraging real-time capabilities, users can swiftly create extensive Personas in under two hours. With the Persona Mapper tool, teams can harness the power of personas to inform design decisions and drive user-centric innovation throughout the UX process.
The sign-up process is a hassle-free process:

Step 1- Click 'Get Early Access' to create an account.

Step 2- Fill out the form and hit apply.
Step 3- Enter the 6-digit OTP you receive in your email id. And sign-in with your email id and password to access the BuildUX Persona Mapper as a basic user, while we review your request for the Pro access.
Know your Dashboard
- Navigation: You can easily navigate your BuildUX account to access your persona mappers in the Dashboard, the Resources (Knowledge Base), Mapper Library, and Blogs. You can also upgrade your account, edit profile, access billing information, and edit and manage your account settings via your dashboard.

- Persona Mappers Management: You can create Persona Mappers, share a particular Mapper, and manage the Persona Mapper tool within the dashboard.

The mapper cards also display an edit or view icon, indicating your access level as an editor or viewer for a specific persona mapper.
-
Persona Attribute Status Updates: Stay informed with real-time status of Persona Attributes of any Persona Mapper in the dashboard.

- Customization: You can customize the mapper cards layout, themes, or settings to suit their preferences. The three dots allow actions like renaming, duplicating, changing the image/ theme of the mapper cards.
Please Note: Owners can delete a particular Persona Mapper by clicking 'Delete' in the action menu (...), while the editors and viewers can revoke self-access by clicking 'Remove' in the action menu.

You can efficiently organize and access your Persona Mappers using the available sorting options, and tailor your workflow to your specific needs and preferences.

- The dashboard offers three distinct Persona Mapper boards with varying persona attributes.

Consumer Mapper- To create Personas for Consumer Products with target audience as individual consumers or households.
Examples of Consumer products- Snacks and Beverages, Home Appliances, Personal Care products, etc
Buyer Mapper- To create Personas for Buyer products with target audience as businesses and organizations.
Examples of Buyer products- Software licenses, Point of Sales (POS) systems, Office furniture, etc
Enterprise Mapper- To create Personas for Enterprise products with target audience as large organizations or enterprises like corporations, government agencies, or non-profit entities.
Examples of Enterprise products- Supply Chain Management (SCM) solutions, Business Intelligence (BI) tools, etc
- You can choose a Persona Mapper from the dashboard based on your specific requirements.
- To explore the different types of mapper boards you can explore the provided sample mappers.

Please note: Any modifications made in the sample Persona Mappers will not get saved.
- Based on the type of Personas you want to create, select from the three available templates, Consumer, Enterprise, or Buyer Persona Mapper.
- The chosen template will take you to an empty Persona Mapper Board.

Understanding Persona Attributes and Scale System
Persona attributes are essential details or traits assigned to each persona to make them more relatable and representative of the target user group.
These attributes help UX designers, product managers, and researchers develop a deeper understanding of their target audience and inform design decisions accordingly.

Persona attributes can be classified into three key dimensions:
- Demographics: This encompasses the tangible and quantifiable characteristics of the users, such as age, gender, location, occupation, and other pertinent information that provides a foundation for understanding their background.
- Psychographics: Delving deeper, this dimension focuses on the intricate layers of users' beliefs, values, goals, motivations, interests, and pain points. Understanding their emotions and aspirations helps create a more empathetic and user-centred design.
- Behaviors: By analyzing users' interactions, preferences, and decision-making processes, we gain valuable insights into their patterns and habits.
In the extreme left corner of the mapper board, clicking on 'Attributes Library' eases the entire process of adding attributes to the mapper.
Adding Demographic attributes enables audience identification. Attributes like Job/ Role, Fictional Name, Age, Gender, Location, Profession, Industry, Income, etc personalize the entire Persona creation process and drive informed decision-making.

For example, in the above 'Food-chain Consumer Persona Mapper', adding attributes like fictional names, persona images, age, location, job role, and family status for each persona establishes a solid starting point in the persona creation process.
These demographics not only differentiate personas from one another but also foster empathy throughout the product/service development process.

In the Persona attributes library, expand the Demographics dropdown to access attributes. Easily add any of these attributes to the mapper under the key category - Demographics, by clicking on the (+) icon next to each one.
For greater customization, you have the flexibility to include attributes beyond the library to meet your project requirements. Just click on (+Add) within the persona mapper to add additional attributes.
Adding psychographic attributes helps in creating more impactful personas by uncovering emotional drivers.
Attributes like goals, needs, pain points, motivations, traits, responsibilities, preferences, etc distinguish between persona segments and help in navigating decision-making processes.

In the above 'Food-chain Brand Consumer Persona Mapper', the customer goals would be looking for cost-effective meal choices, eating freshly prepared food, etc. The needs would be prompt service, value for money, a variety in menu, etc.

The attributes library also includes commonly used Psychographics, with sub categories offering dropdown options for more attributes.
Simply click on the (+) sign next to each attribute in the library, and the selected attribute will be added at the bottom of the mapper board.
Behavior attributes provide insights into how users interact with a product or service.
Designers can use user behavior insights like purchase behavior, product usage, etc to validate design choices, prioritize features, and optimize the overall user experience.

For example, in the above Food-chain brand consumer mapper, Behavior attributes like communication and social media channels will help to tailor marketing efforts, enhance engagement, and deliver personalized experiences for improved customer satisfaction.
Leveraging these insights will enable the brand to build a strong online presence, target the right audience, and maintain a positive reputation.
The attribute library encompasses frequently used Behavior attributes, with several sub-categoroes that offer additional dropdown options for attributes.
Simply click the (+) icon beside the desired attribute, and it will get added at the bottom of the mapper board.
- A scale system is a standardized method of measuring attributes with predefined values or levels. It facilitates quick and efficient data collection, analysis, and comparison across different scenarios.Utilizing a scale system leads to improved clarity, precision, and facilitates data-driven decision-making.
- A suggestive scale system is applied to each attribute assigned to a persona.

- The scale system allows users to aggregate and analyze data across multiple personas and attributes, providing valuable insights into user preferences, patterns, and trends.
Please Note: You can edit and create scales based on your project requirements.

For example: For the attribute 'Opinions' we can edit the scale system as 'Strongly Disapprove to Strongly Approve'
- The integration of attributes and the scale system in the real-time mapper board offers significant time-saving benefits by consolidating the process of creating and managing personas into a single living document.
Interactions within the Persona Mapper Board
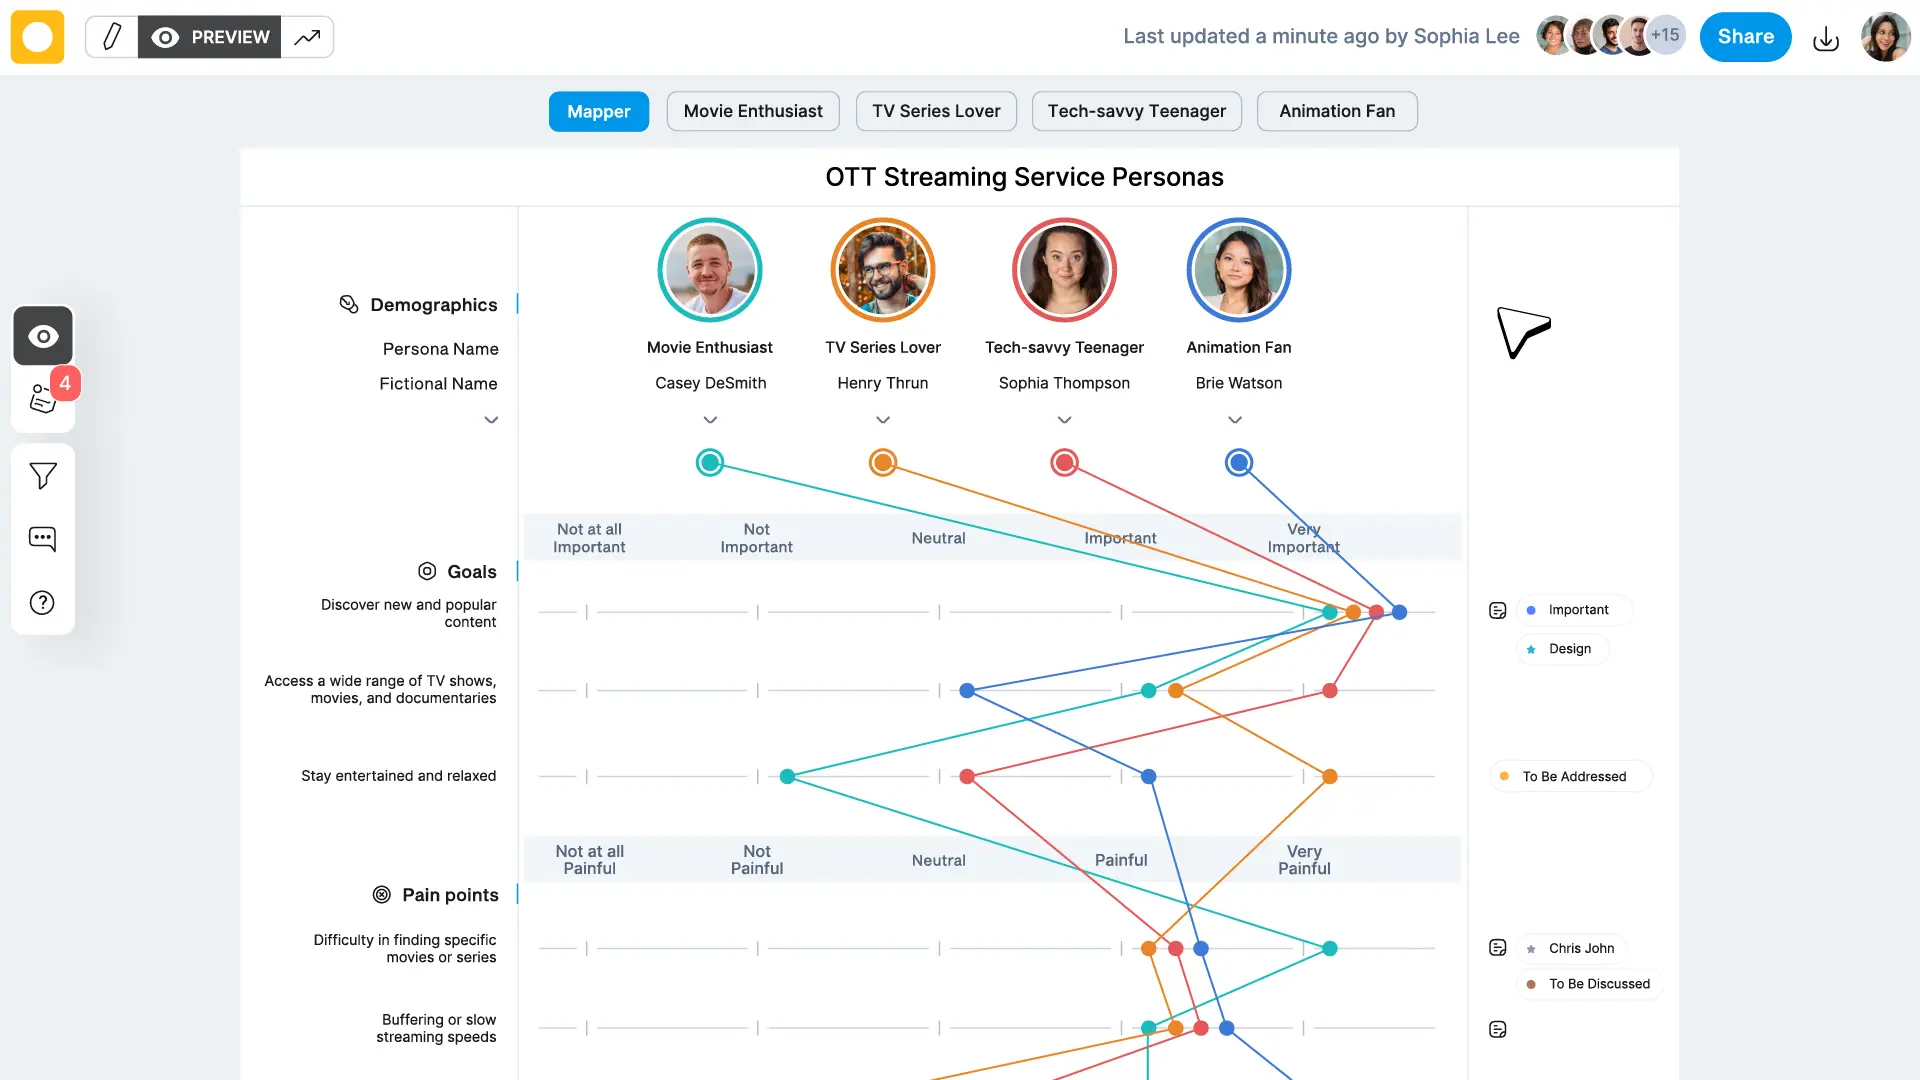
To establish a connection between the Persona and its corresponding attributes on a scale system, there are certain interaction points in the Persona Mapper Board.

1) Persona Icon
2) Persona Dropper Icon
3) ‘+’ or ‘Hotspot’ on the scale system
- By clicking on a Persona Dropper Icon, the selected Persona gets activated, initiating the mapping mechanism on the Attribute Scale.
- On clicking at any of the five Hotspots, the activated persona gets connected to the selected value on the scale for a corresponding attribute.
- By clicking on any of the five Hotspots, you get a multi-select menu using which you can assign that particular value on the scale to selected personas in one go.

Please Note: You must not have any persona activated/ selected before performing this action.
- Click on any Persona Dropper Icon to activate it.

For example: In the above example, Savitha Aggarwal, the Senior Hindustani Vocalist is the activated persona.
Please Note: Activation and attribute mapping on the scale use the same color as the dropper icon of the selected persona.
- To assign attribute values, hover the cursor over the Attribute scale and click on the corresponding hotspot (+) that represents the appropriate value/degree for the selected persona.
video showing the process.
- For the very first attribute, you will see a line segment connecting the dropper icon of the activated persona to the selected attribute scale value.

In the above mapper board, the blue dot shows the highest value 'Very Important' on the scale, for Savitha the Senior Hindustani Vocalist, for the attribute 'Find more dedicated students'.
Please Note: The value on the scale for every persona will be represented by a distinct colored dot (same color as that of the corresponding persona).
- Repeat the process for all the personas on the mapper board.

- You can connect the personas to any number of attributes necessary to be added on the mapper board.
How does the Persona Mapper tool work?
- In the empty Persona Mapper Board:
a. Locate 'Untitled Personas'
b. Click on the naming field and enter the desired name.

Please Note: Name your Persona Mappers clearly so that it is always easy to maintain, refer, collaborate, or share them.
For example, the title for a car-hailing service app persona mapper can be 'XYZ Rider Persona Mapper'. The title itself suggests that the mapper covers personas for XYZ brand, and target user base 'Riders'.
- You can add a Brand logo to your Persona Mapper.
Please Note: For Free Plan- Only the Owner can edit the brand logo.
For All Paid Plans- The Owner and the editor can edit the brand logo.
- The empty Persona Mapper Board displays three personas by default.

Please Note:
a) You can add upto 10 personas by clicking the (+) sign at the extreme right of the mapper board.
b) Delete any persona by clicking on the three dots on the right of the persona.
c) The personas created must align with a single category or archetype. For example, for an online cab-hailing service app, where the user base is Riders and Drivers. If we are using the Persona Mapper board for the target audience ‘Riders’, all our personas will be riders.
We CANNOT add a Driver’s persona to the mapper board, or else the entire purpose of the Persona Mapper will fail.
- The detailing of the Personas begins with giving them their 'Persona Archetype' .
For example, in a 'bedding consumer persona mapper', if we have two personas, persona A can be of archetype 'Budget Buyer' whereas persona B can be of archetype 'Variety Shopper'.
The persona archetypes serve as the initial differentiating parameter and guide the subsequent process of creating personas.
- You can now assign 'Fictional Names' to your personas, feed demographic information, before populating the mapper board with vital data points.
- You can enhance your personas with personalized avatars. Easily upload, delete, or update the image at any time. You can optimize your time with AI support for this step.
- Evaluate what user attributes you would like to add to the mapper board. You can also choose from a built-in persona attribute library that has over 200 attributes.

- Moreover, you can also identify important attributes with suggestions from AI (clicking the blue diamond icon), integrated into the Persona Mapper.

- Consider the importance of each attribute before assigning it a place on the suggested scale.

- Use suggested scales in the mapper or create custom scales that align with your project requirements.
- Regularly review and refine the attribute positions as needed based on project progress or new insights.
How to share and collaborate with the Persona Mapper?
Need a virtual brainstorming session? With real-time sharing and collaboration features, you can invite teammates to access and interact with the mapper, adding their own thoughts, observations, and ideas.

- The Owner can share the editing or viewing rights with an individual (with or without a BuildUX account) by sending the invite on the individual's email address.
Please note- An anonymous viewer can view the Report and Analysis document, only if the the link settings is set to 'Anyone with the link'.
- You get to know the status of whether the invite has been accepted, rejected, or pending in the same pop-up.

- The Owner can transfer their ownership to the added editor and can even revoke self access from any persona mapper.
- If a free plan user has already edited two mapper boards (either as an owner or an editor), even on receiving an e-mail invitaion to edit a persona mapper, they will only have view access to that particular mapper board, untill they upgrade to any of the paid plan.
Got an attribute that needs attention? Simply assign it to the people in charge, and watch as your team rallies together to tackle it head-on.

- For every attribute, on clicking the action menu (...), you can add a status to indicate the way in which it has to be addressed, like important, to be addressed, or critical.
You can also custom add a status for any attribute, like 'Urgent', 'Already Addressed' etc as per your requirement.
- You can also assign an attribute to members with the persona mapper access, and even add a note to any attribute to elaborate on how it needs to be addressed.
- You can rearrange the order of your attributes by moving them up or down, allowing you to prioritize them accordingly.
- Additionally, you have the flexibility to insert a new row between existing attributes, providing space to accommodate additional attributes when required.
How to leverage AI integration within the Persona Mapper?
Besides choosing an image from the library or uploading an image from the device, you can also deploy the in-built AI image generator which will create on-spot images on entering a short description.

- Enter a short text that best describes your persona image requirements, for example, for an archetype 'Health conscious snacker', you may enter the text as 'A female/ male who is a health conscious snacker'.
- From the drop-down menu you can select the style of image you need.
- You can regenerate images on clicking the search button, to see a fresh set of image options.
You can add custom attributes to the personas as per your project requirements or add with the built-in attribute dictionary on the left hand side. You can also get suggestions from AI to use the Persona Mapper tool to its full potential.

- Click on the blue diamond icon on the left side of the attribute. AI will suggest 5 key attributes depending upon the section (goals, needs, pain points, etc) on clicking the icon.
- You can regenerate or ask for more suggestions, you can also get the suggested text shorter or longer by clicking on the desired item in the action menu.
Sharing and Permissions
In a persona mapper, you'll find six distinct roles:
- Super Admin- One who purchases a plan (for BuildUX Teams and Build UX Enterprise plans). Can add/ remove up to 3 admins depending upon the number of purchased licenses.
Admin- Has exclusive control over billing details and the ability to manage access rights within the BuildUX Teams and Enterprise plans (same as that of the Super Admin).

- Owner- One who creates a persona mapper is the owner of that particular mapper. The Owner initiates sharing and assigning access levels to other roles.
- Editor- Has the ability to modify, collaborate, and share the persona mapper board, including making changes to the file.
- Admin & Editor- Has permissions of both admins and editors, providing individuals with complete control over the BuildUX tool and the assigned persona mapper board.
- Logged in User- Has only view and comment access to the Report and Analysis document of the Persona Mapper.
- Anonymous User- Has no account on BuildUX and can only view the Report and Analysis document shared via link.
Remember, it's important to carefully assign access levels based on the requirements and trust levels of the individuals or groups you share the file with.
- You are an admin when you upgrade your plan from BuildUX professional to BuildUX teams. Only the admin has access to billing details.
- Team Console rights rest exclusively with the admin.
- The admin can revoke and re-assign access from someone centrally.

P.S.- An admin can be an editor too on any mapper board. Adnmin+Editor have access level of both admins and editors.
- Owners initiate sharing and assigning access levels to editors and viewers in their mapper board.
- They can transfer ownership to editors and viewers. The original owner's access level automatically changes to the editor level.

- Editors can make changes to the file, assign attributes, and share the mapper board assigning access levels as editor or viewer.

- Logged-in viewers are individuals who have a BuildUX account.
- They can view and comment on the Report and Analysis document of the Persona Mapper.

- Anonymous or logged-out viewers are individuals who don't have a BuildUX account.
- They can only view the Report and Analysis document of the Persona Mapper.

Build UX Plans and Features
We offer a range of flexible plans to suit your specific needs. Choose the plan that best aligns with your requirements and unlock the full potential of the Persona Mapper.
You can upgrade or switch plans at any time to accommodate your evolving needs. Sign up now and make the best use of our game-changing tool with the plan that suits you best.
- Cost: $0
- Ideal for individuals/ freelancers or small-scale projects.
- A selection of essential features to get started like 2 Persona Boards (10 Personas/ Persona Board) to the editor.
- Real-time collaboration with up to 100 viewers who can view your Persona Mapper Board, either by their individual ids or anonymously (as per your choice). P.S.- The viewers do not have edit access.
- Limited usage and access to advanced functionalities.

Upgrade to unlock additional features and premium support!
- Cost: $15/month
- Designed for professionals and small businesses.
- Includes all the features of the Free Plan, plus:
- 50 Persona boards (10 Personas per mapper board)
- Unlimited Persona Mapper Boards where you are invited to as editor
- Customer support within 24 hours.
- Suitable for those who require advanced capabilities and personalized assistance.
- Cost: $20 per Editor per month
- Tailored for teams and collaborative work environments.
- Includes all the features of the BuildUX Professional Plan, plus:
- 100 Persona boards (10 Personas per mapper board)
- Team Management Console access to the Admin
- Mapper Library access to the Admin
- Priority support within 24 hours
- Ideal for businesses that require coherent collaboration and efficient project management.
- Custom pricing based on specific requirements.
- Designed for large enterprises and organizations.
- Tailored solutions, dedicated account management, and priority support.
- Contact our sales team to discuss your unique needs and receive a personalized quote.
Payment and Billing
Step 1: Access Upgrade Option
- Signing up for BuildUX gives you the privileges of the free ‘Basic Plan’.
- Click on the Upgrade icon located at the top-right corner (next to the User icon) of the dashboard.

- You will find different subscription plans available for upgrading your account.
- Review the features and benefits associated with each plan to find the one that best suits your needs.
Step 2: Select Your Plan
- Click on “Buy BuildUX Mapper Professional” if you want to purchase the Professional plan or click "I’m Interested" if you want to purchase the Teams or Enterprise plan.
- A new page will display the Billing details of the selected plan, including pricing and features.
- By clicking the switch button, you can switch across monthly or annual billing settings.

Please Note- Purchasing the annual plan saves you the cost of two months on the monthly plan.
Step 3: Payment and Confirmation
- Enter your payment details, which include your credit card information. Double-check the payment information for accuracy and security.
- You can save your card information securely to facilitate future transactions, allowing you to complete the checkout process with just one step instead of having to re-enter your details each time you make a purchase.
- Once the payment is processed successfully, you will receive a confirmation mail indicating that your account has been upgraded.
- Review the plan details and click on the "Upgrade" or "Subscribe" button to proceed.
Step 1: Access Account Settings
- Log in to your BuildUX account using your credentials (if you are not logged in.
- Click on your User icon located in the top-right corner of the dashboard.
- From the drop-down menu, select "Billing".
Step 2: Navigate to the Billing Page
Locate edit icons near the following field to make the required changes:

- You can edit the billing cycle from ‘monthly’ to ‘annually’ by clicking the Auto-renewal switch.
- You can edit the number of editors (this changes the number of licenses purchased.
Please Note- You cannot reduce the number of editors.
- You can click on ‘Contact Us’ to change your billing cycle and billing date.
- You can edit your card information in the Payment Methods.
Step 3: Save Changes
- A pop-up will appear, prompting you to update your information.
- After making any changes click on the "Save" button to apply the changes.
- You will receive a confirmation mail indicating that your payment details have been successfully updated.
Access your 'Billing History' to view a complete record of all your past purchases, conveniently available on the same page.
Account Settings

- You can edit your 'Name', 'Designation', 'Company Name', 'Company Size', and 'Country' anytime.
- You can upload, change, or delete your account's image anytime.
- Hit save after making edits in your account information.

For the smooth functioning of the BuildUX tools, any edits in your email address and BuildUX Role, is subjected to the approval of the Admin.
- Click on the 'Change Password' button and follow the below screen.

- Enter the three fields, 'Current Password', 'New Password', and 'Confirm password' and click 'Save'.
You can delete your BuildUX account permanently anytime.

Please Note: Once your account is deleted, all associated content will be permanently lost and cannot be recovered.


